In this blog I will go through how to setup my java script libraries to the Master Page. All my java script sample in the blog will refer to the customized master page. This customized master page for me I named it as msisgreat.master.
Creating master page
If you want to customize the master page in SharePoint first you need to enable the Publishing Infrastructure & Publishing Feature. Once enabled open the https://<sitecollection>/_catalogs/masterpage in the windows explorer view. I like the Oslo.master page because it does not have the left navigation control. So in all my sample code I use the oslo.master as the base master page. To create the custom master page with oslo.master as base. Just select the below files in the explorer view
Oslo.master
Oslo.html
Oslo.preview
Copy all the above files and paste again in the same masterpage folder. Now you will see oslo copy.master, oslo copy.html & oslo copy.preview. Now just rename only .html and .preview file to the name you wanted. In my case I renamed oslo copy.html to msisgreat.html & renamed oslo copy.preview to msisgreat.preview. Please do not rename the .master file because this file is always tied to.html, renaming .html will rename .master file or new file will be created with msisgreat.master.
Now that you have 3 files with msisgreat name publish all 3 files to a major version. First time you need to publish as major version so that you can apply as a master page in the site settings page.
Copying the dependency files
Navigate to my github webpage for js project in this URL Use the clone download Zip option to get all the files to the local directory. Once zip file is downloaded unzip it to any temp folder. In the unzipped folder look for dependency folder.

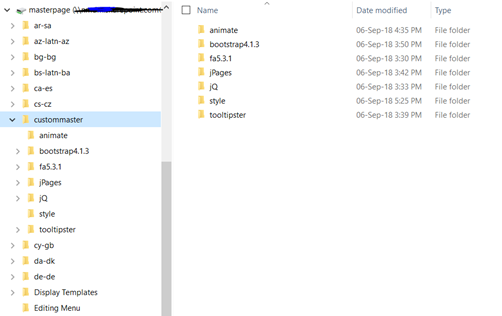
Open the masterpage (https://<sitecollection>/_catalogs/masterpage) in the explorer view. Now create a folder called custommaster inside the masterpage folder. Navigate inside the custommaster folder and paste the files copied in early step into this folder. This will take longer depends on the speed of the network. For me it took 25 minutes to copy all the dependency files. Once coped the folder structure will look like below
Adding the dependency snippet
Once the master page is created and ready. Open the masterpage folder in windows explorer view. Locate the msisgreat.html file, use your popular editor in my case Visual Studio code to open the html file. Once the file is opened in the editor locate for the below tag
<![CDATA[ [endif] ]]> <!–[if lte IE 8]>
<style type=”text/css”>//<![CDATA[
.ms-core-animation-transparent,
.ms-core-animation-transparent img
{
-ms-filter:”alpha(opacity=0)”;
}
.ms-isBot .ms-core-animation-transparent,
.ms-isBot .ms-core-animation-transparent img
{
-ms-filter:””;
}
//]]></style>
<![endif]–>
Locate the above snippet of the code in the master page. Once you locate. Now copy the below code and paste it after that <![endif]à
<link rel=”stylesheet” href=”./custommaster/animate/animate.css” />
<link rel=”stylesheet” href=”./custommaster/jq/jquery-ui-1.12.1/jquery-ui.css” />
<link rel=”stylesheet” href=”./custommaster/style/mystyles.css” />
<link rel=”stylesheet” href=”./custommaster/fa5.3.1/css/all.min.css” />
http://./custommaster/jQ/jquery-3.3.1.min.js
http://./custommaster/jq/jquery-ui-1.12.1/jquery-ui.js
<link rel=”stylesheet” type=”text/css” href=”./custommaster/tooltipster/css/tooltipster.bundle.min.css” />
<link rel=”stylesheet” type=”text/css” href=”./custommaster/tooltipster/css/plugins/tooltipster/sideTip/themes/tooltipster-sideTip-shadow.min.css” />
<link rel=”stylesheet” type=”text/css” href=”./custommaster/tooltipster/css/plugins/tooltipster/sideTip/themes/tooltipster-sideTip-punk.min.css” />
http://./custommaster/tooltipster/js/tooltipster.bundle.min.js
<link rel=”stylesheet” type=”text/css” href=”./custommaster/bootstrap4.1.3/css/bootstrap.min.css” />
http://./custommaster/bootstrap4.1.3/js/bootstrap.min.js
Basically the above snippet will add all the dependencies you wanted to the master page. Now save the master page and publish only .html file. Do not touch the .master file in any scenario. The bootstrap references are optional. Beware this will completely change your site font and color. So add only if you need bootstrap to beautify pages.

Pingback: jQuery based client side site review with smileys – Senthamil
Pingback: Get Taxonomy Term set, custom properties & Terms using JSOM – Senthamil
Pingback: Resolve people picker control using jQuery – Senthamil
Pingback: Vue JS – SharePoint list operation using REST service – Senthamil
Pingback: jQuery code to get team names from SharePoint profile – Senthamil
Pingback: jQuery based Followed Documents list with animation and pagination – Senthamil