Teams Management using Microsoft Graph API within SPFx

Microsoft Graph API has several REST API to manage different products. Team API is one among them. Graph API uses REST method with JSON format to complete the request.

Create Team v1.0 : V1.0 of the Graph API uses the Microsoft 365 Groups for the creation of Teams. Teams is nothing but an extension of M365 groups. So if you are using v1.0 you need to create Groups first then using the Group ID then create the Teams. The Group you are creating should have minimum of one Owner to it. Also one other issue I often encounter using this API is that the Creation of Team fails with 404 if the Group is created in last 15 min.

Create Team Beta: Using this API you can directly create the Teams. This API is used within my SPFx code.

SPFx Webpart

To create webpart from the scratch use the below command

yo @microsoft/sharepoint `
–solution-name “spfx-teamsManagement” `
–component-name “teams-management” `
–component-description “Manage Teams from SPFx. Create Teams, Create Channel, view all Teams properties.” `
–component-type “webpart” `
–framework “none” `
–environment “spo” `
–package-manager “npm” `
–skip-feature-deployment


Once the project is created make sure you add the relevant permission needed to execute the Graph API. Open the package-solution.json and insert the below code inside

“webApiPermissionRequests”: [  
      {  
        “resource”: “Microsoft Graph”,  
        “scope”: “User.Read.All”  
      },
      {  
        “resource”: “Microsoft Graph”,  
        “scope”: “User.ReadWrite.All”  
      },
      {  
        “resource”: “Microsoft Graph”,  
        “scope”: “User.ReadBasic.All”  
      },
      {  
        “resource”: “Microsoft Graph”,  
        “scope”: “Group.Read.All”  
      },
      {  
        “resource”: “Microsoft Graph”,  
        “scope”: “Directory.Read.All”  
      }  
    ]

Dependencies

My Project uses the below dependencies and types

“dependencies”: {
    “@fortawesome/fontawesome-free”: “^5.13.0”,
    “@microsoft/sp-core-library”: “1.10.0”,
    “@microsoft/sp-property-pane”: “1.10.0”,
    “@microsoft/sp-webpart-base”: “1.10.0”,
    “@microsoft/sp-lodash-subset”: “1.10.0”,
    “@microsoft/sp-office-ui-fabric-core”: “1.10.0”,
    “@types/webpack-env”: “1.13.1”,
    “@types/es6-promise”: “0.0.33”,
    “animate.css”: “^3.7.2”,
    “bootstrap”: “^4.4.1”,
    “jquery”: “^3.4.1”
  },
  “devDependencies”: {
    “@microsoft/microsoft-graph-types”: “^1.13.0”,
    “@microsoft/rush-stack-compiler-3.3”: “0.3.5”,
    “@microsoft/sp-build-web”: “1.10.0”,
    “@microsoft/sp-module-interfaces”: “1.10.0”,
    “@microsoft/sp-tslint-rules”: “1.10.0”,
    “@microsoft/sp-webpart-workbench”: “1.10.0”,
    “@types/bootstrap”: “^4.3.2”,
    “@types/chai”: “3.4.34”,
    “@types/jquery”: “^3.3.34”,
    “@types/mocha”: “2.2.38”,
    “ajv”: “~5.2.2”,
    “gulp”: “~3.9.1”,
    “url-loader”: “^4.1.0”
  }

Screens


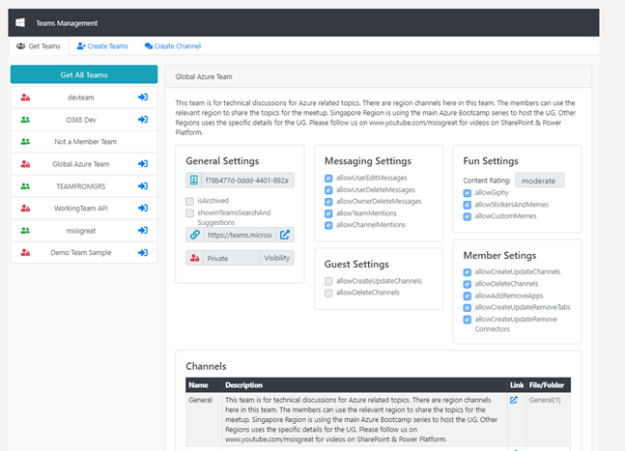
Get Details about the Teams
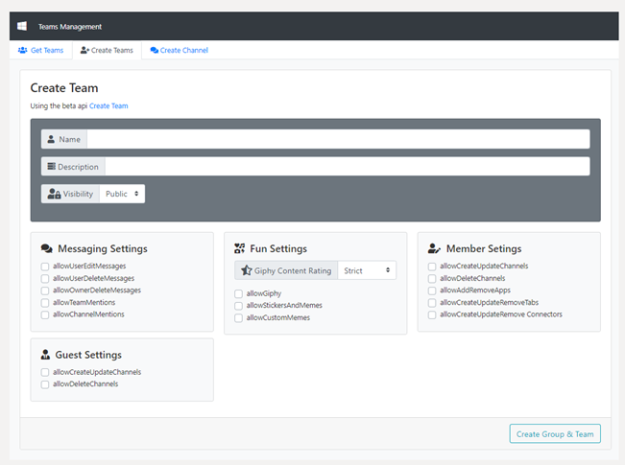

Create New Teams


Create New Channel


Source Code:

The full source code is here

https://github.com/msisgreat/spfx/tree/master/spfx-teamsManagement

YouTube

SPFx – Microsoft Graph with Teams API

Microsoft Graph api helps to connect various platform within Microsoft 365. One of the platform is Microsoft Teams. Microsoft Teams API helps developer to get Channel and Chat information from Particular Teams. It helps to integrate with various existing application. SPFx latest framework has native support to Microsoft Graph API. Authentication to execute api is much easier. Please watch below video for step by step guide on how to integrate Teams API within SPFx

The full source code is here on github https://github.com/msisgreat/spfx/tree/master/msgraph-teams

Please subscribe to my channel to see more videos on SPFx development

SPFx – jQuery , Bootstrap4 & Font Awesome

Enable the jQuery, Bootstrap4 & font awesome for the SPFx

Step 1: Create SPFx

yo @microsoft/sharepoint –solution-name “jquery-spfx” –component-name “jqueryspfx-wp” –component-description “This webpart will use the jQuery, bootstrap and font awesome.” –component-type “webpart” –framework “none” –environment “spo” –package-manager “npm” –skip-feature-deployment

Step 2: Install additional packages

npm install jquery –save

npm install @types/jquery –save-dev

npm install bootstrap@4 –save

npm install @types/bootstrap@4 –save-dev

npm install –save @fortawesome/fontawesome-free

npm shrinkwrap

npm install url-loader –save-dev

Step 3: Config.json

“externals”: {

    “jquery”: {

      “path”“node_modules/jquery/dist/jquery.min.js”,

      “globalName”“jQuery”

    },

    “bootstrap”: {

      “path”“node_modules/bootstrap/dist/js/bootstrap.bundle.min.js”,

      “globalName”“bootstrap”,

      “globalDependencies”: [

        “jquery”

      ]

    }

  }

Step 4: Gulpfile.js

const build = require(‘@microsoft/sp-build-web’);

build.configureWebpack.mergeConfig({

    additionalConfiguration: (generatedConfiguration) => {

        generatedConfiguration.module.rules.push({

            test: /\.woff2(\?v=[0-9]\.[0-9]\.[0-9])?$/,

            loader: ‘url-loader’,

            query:{

                limit:10000,mimetype:‘application/font-woff2’

            }

        });

        return generatedConfiguration;

    }

});

https://blog.kloud.com.au/2017/07/06/spfx-bootstrap-react/

Step 5: webpart ts file

import * as $ from “jquery”;

import * as bootstrap from “bootstrap”;

require(‘../../../node_modules/bootstrap/dist/css/bootstrap.min.css’);

require(‘../../../node_modules/@fortawesome/fontawesome-free/css/all.min.css’);


SPFx Webpart using jQuery Plugin & Bootstrap

In this blog I will explain how to create a SPFx webpart using the Bootstrap & Jquery plugin tooltipster https://iamceege.github.io/tooltipster/. The tooltipster is one of the popular jquery plugin used to show formatted tooltip when a mouse hover or click event occur. The plugin is easy to use and can use html formatting for the title attribute of the html element. My sample application uses the latest fontawesome 5 to show the smilies. The finished application will look like below. The webpart will have 3 smilies which are fontawesome 5 icons, clicking on the icon will popup the tooltipster window. The tooltipster will have html format to get the comment and submit button. The submit button will save the comment, current user email to the list in SharePoint. PNPjs is used to add item to the list.

Full source code is in the Github https://github.com/msisgreat/spfx/tree/master/msisgreat

Libraries Used

  1. Bootstrap v4.3.1
  2. jQuery v3.4.1
  3. Font Awesome 5.10.1
  4. Tooltipster v4.2.6
  5. Pnpjs v1.3.5

Below is the screenshot of my dependencies from the package.json file

Step: 1

After creating the basic webpart using the reactjs option. Follow the steps from my previous blog to add the reference to bootstrap and fontawesome 5. You can read from here

Step : 2

Use below commands to install other dependencies

npm install jquery --save
npm install tooltipster --save
npm install @pnp/logging @pnp/common @pnp/odata @pnp/sp @pnp/graph --save

In this sample I didn’t use any Microsoft Graph code, I just used the above command to install all the pnp module just in case. You can install what will work for you.

Once the libraries are installed add the below json entry to the config.json file under the “externals”:

"jquery": {
"path": "node_modules/jquery/dist/jquery.min.js",
"globalName": "jquery"
},

"bootstrap": {
"path": "node_modules/bootstrap/dist/js/bootstrap.min.js",
"globalName": "bootstrap"
},

"tooltipster": {
"path": "node_modules/tooltipster/dist/js/tooltipster.bundle.min.js",
"globalName": "tooltipster"
}

The full config.json will look like this

Step: 3

Now open the SharePoint and create the List name “Feedbacks” in the site. The List will have 3 columns. Alternatively you can download the list template from here

Column Name Type
Title Single line of text
Comment Multiline Text
FeedbackType Choice field with

Excellent

Average

Poor

Step: 4

In the sample used here the webpart name is msisgreat. So you can see the file msisgreat.tsx under components folder. Open the full code using the Visual Studio Code and navigate to the components folder to see all the files.

Now create a file called Feedback.tsx under components, this is the React component which will display 3 smilies with the jsx elements. You can copy the code from the file here

Basically the code contains the reference to jquery and tooltipster and the code to load the component.

Step: 5

Go back to main webpart file in this case msisgreat.tsx, open the file and reference to the feedback component

Import Feedback from "./Feedback"

In the JSX add the <Feedback></Feedback>

Step: 6

I have used some of the custom styles in the sample. You can see those in the .scss file. Those are used as styles.<name> inside the Feedback.tsx

Once the code is done use the gulp serve to test it

Follow this article to package and deploy to the Developer site to test the original code to save to list

https://docs.microsoft.com/en-us/sharepoint/dev/spfx/web-parts/get-started/serve-your-web-part-in-a-sharepoint-page

SPFx – Adding Bootstrap & Font awesome 5

Node.js: v10.16.0
SPFx: 1.9.1

Bootstrap & Font Awesome are my mandatory libraries to build any site on SharePoint Online. I used it often to customise the look of SharePoint using the content editor webpart with js & css. When I tried to migrate my code to SPFx one of the challenge I faced was how to install those in the solution. Well we have several choices to add those in the framework
Before adding libraries please go through this Link from Microsoft Docs to understand how those external dependencies are loaded and handled within SPFx
https://docs.microsoft.com/en-us/sharepoint/dev/spfx/web-parts/basics/add-an-external-library
Global Reference Approach:
In the below code I used the global option to load those libraries so that multiple webparts can make use of the libraries.

Step :1

After finished creating the WebPart solution using Yo generator install the bootstrap and font awesome using the below

npm install jquery --save
npm install @types/jquery --save-dev
npm install bootstrap@4 --save
npm install @types/bootstrap@4 --save-dev
npm install --save @fortawesome/fontawesome-free

Step:2

Add external references to the config.json file
Locate the config.json file under the config folder and add the below entry to the file

"externals": {
"jquery": {
"path": "node_modules/jquery/dist/jquery.min.js",
"globalName": "jQuery"
},
"bootstrap": {
"path": "node_modules/bootstrap/dist/js/bootstrap.min.js",
"globalName": "bootstrap"
}
}

Step 3:

Font awesome is not recognised by default by the webpack, so the gulp has to recognise the font format before it loads it to the solution. Run the below command to install the url loader

npm install url-loader --save-dev

After installing add the below to the gulp.js file which is at the root folder

'use strict';
const gulp = require('gulp');
const build = require('@microsoft/sp-build-web');
build.addSuppression(`Warning - [sass] The local CSS class 'ms-Grid' is not camelCase and will not be type-safe.`);
build.configureWebpack.mergeConfig({
additionalConfiguration: (generatedConfiguration) => {
generatedConfiguration.module.rules.push(
{
test: /\.woff2(\?v=[0-9]\.[0-9]\.[0-9])?$/,
use: {
loader: 'url-loader'
}
}
);
return generatedConfiguration;
}
});
build.initialize(gulp);

Step 4:

Now add the entry into the .tsx file to reference the bootstrap CSS & JS and the font awesome CSS

import * as jQuery from "jquery";
import * as bootstrap from "bootstrap";
require('../../../../node_modules/bootstrap/dist/css/bootstrap.min.css');
require('../../../../node_modules/@fontawesome/fontawesome-free/css/all.min.css');

jQuery based Followed Documents list with animation and pagination

Please follow my prerequisite blog to add the jQuery dependency on the master page. The below jQuery code will work with jQuery dependency.

GIF

Followed Documents

In this blog I would explain how to create an animated jquery based document list. The documents listed will be the followed documents within SharePoint. The list will call REST api to get all the followed documents. https://docs.microsoft.com/en-us/sharepoint/dev/general-development/following-people-and-content-rest-api-reference-for-sharepoint read for more information on the api and its parameter.

My code uses the followed parameter filtered by types 2 which is documents only. SharePoint allows to follow different types like site, list, item etc. The api I am using will get only documents https:////_api/social.following/my/Followed(types=2).

You can download the full code here in my github repository. The code repository has 3 type of files .htm, .js &.css files. The htm file has all the html elements needed to load the documents. All the code is in the js file which is invoked in the document ready function. The js file is referred in the htm to invoke. CSS file for the UI and design.

The code uses the several dependency scripts & css, all the dependencies are here in the Github. Vue.js and Bootstrap are optional dependencies. The mandatory dependencies are below

  1. jQuery, version is uploaded in that above github URL please use that
  2. Font Awesome – is for icons like copy clipboard, folder and email option
  3. jPages – for pagination of the files, you can customize it to show no of files in a page with previous and next option
  4. Animate – is for fadeInDown animation when documents are loaded.
  5. Tooltipster – for nicer tooltip when mouse over icons. (optional)
  6. jQToast – it is for toast kind of message which is shown on the top right when you copy clipboard.

The javascript code uses 2 main function GetFollowingDocuments() & followedRetrieval(). Make sure you change the site collection URL in the GetFollowingDocuments() function to make it to work. Some javascript utility functions are there to support the UI. Like getting the extension picture for specific type of documents. I have covered only few types which are major. If you want to have more types need to add more pic url for each types. Some of sample screenshots below. The png type is unknown icon because I have not handled the image for it. So you can extend those support in the code GetImagePath()


Search REST API for SharePoint – Multiple use cases

SharePoint Search API is helpful to create a client side webpart. You can build a complete search experience without refreshing the page with the responsive client side search result. To build such webpart fist we need to understand how the REST API and its parameter work. The search REST API will always return the jSON file. We can then use the jQuery api to parse the result and show the search result in the way wanted.

In this blog I will explain few of sample search API used to search documents within the SharePoint. To understand the basics of Search API follow this link https://docs.microsoft.com/en-us/sharepoint/dev/general-development/sharepoint-search-rest-api-overview

Below are some of the API parameters and search use cases in the SharePoint.

Use this url to get text format
Search documents, pages, list items from anywhere with the 20 results, the below query will sort the results in descending order

https://sitecollection/site/_api/search/query?querytext=’*’&sortlist=’LastModifiedTime:descending’&rowlimit=20

Search all sites and everything and return only selected properties in the JSON. Note that the date return will be fixed format you need to convert it to local date time.

https://sitecollection/site/_api/search/query?querytext=’*’&sortlist=’LastModifiedTime:descending’&rowlimit=20&selectproperties=’Title,ModifiedOWSDATE,EditorOWSUSER,Path,ParentLink,FileExtension,FileName,ServerRedirectedEmbedURL&#8217;

Search everywhere any documents with the specific extensions only – doc, pdf, excel, powerpoint, txt and mpp files only

https:// //_api/search/query?querytext=’*’&sortlist=’LastModifiedTime:descending’&rowlimit=20&selectproperties=’Title,ModifiedOWSDATE,EditorOWSUSER,Path,ParentLink,FileExtension,FileName,ServerRedirectedEmbedURL’&refiners=’fileextension’&refinementfilters='(fileExtension:or(“docx”,”pdf”,”doc”,”xls”,”xlsx”,”xlsm”,”ppt”,”pptx”,”mpp”,”csv”,”txt”))’

Search documents only from me (My documents anywhere inside SharePoint) my email in below case is senthamilv@outlook.com, searches only by that user id

https:////_api/search/query?querytext=’*’&sortlist=’LastModifiedTime:descending’&rowlimit=20&selectproperties=’Title,ModifiedOWSDATE,EditorOWSUSER,Path,ParentLink,FileExtension,FileName,ServerRedirectedEmbedURL’&refiners=’EditorOWSUSER,fileextension’&refinementfilters=’and(fileExtension:or(“docx&#8221;,”pdf”,”doc”,”xls”,”xlsx”,”xlsm”,”ppt”,”pptx”,”mpp”,”csv”,”txt”) , EditorOWSUSER:(Senthamilv@outlook.com))’

Search only my (specific user) documents from specific URL. In below query it searches only from https:///sites/ms/

https:///sites/_api/search/query?querytext=’*’&sortlist=’LastModifiedTime:descending’&rowlimit=20&selectproperties=’Title,ModifiedOWSDATE,EditorOWSUSER,Path,ParentLink,FileExtension,FileName,ServerRedirectedEmbedURL’&refiners=’EditorOWSUSER,fileextension,Path’&refinementfilters=’and(Path:”https:///sites/ms/*&#8221;,and(fileExtension:or(“docx”,”pdf”,”doc”,”xls”,”xlsx”,”xlsm”,”ppt”,”pptx”,”mpp”,”csv”,”txt”) , EditorOWSUSER:(Senthamilv@outlook.com) ))’

Search all my documents from One Drive only

https:////_api/search/query?querytext=’*’&sortlist=’LastModifiedTime:descending’&rowlimit=20&selectproperties=’Title,ModifiedOWSDATE,EditorOWSUSER,Path,ParentLink,FileExtension,FileName,ServerRedirectedEmbedURL’&refiners=’EditorOWSUSER,fileextension,Path’&refinementfilters=’and(Path:”https://mysite..com/personal*”,and(fileExtension:or(“docx”,”pdf”,”doc”,”xls”,”xlsx”,”xlsm”,”ppt”,”pptx”,”mpp”,”csv”,”txt”) , EditorOWSUSER:(Senthamilv@outlook.com)))’

Search all documents modified by (name *)

https://<sitecollection//_api/search/query?querytext='ModifiedBy:senthamil*'&sortlist='LastModifiedTime:descending'&rowlimit=20&selectproperties='Title,ModifiedOWSDATE,EditorOWSUSER,Path,ParentLink,FileExtension,FileName,ServerRedirectedEmbedURL'&refiners='fileextension'&refinementfilters='(fileExtension:or("docx&quot;,"pdf","doc","xls","xlsx","xlsm","ppt","pptx","mpp","csv","txt"))'

Search documents from your team members (peers and manager). For this search you can first find all your team members using my other blog here. Once the team member email addresses are known, those emails can be used as search refiners.

https:////_api/search/query?querytext=’*’&sortlist=’LastModifiedTime:descending’&rowlimit=20&selectproperties=’Title,ModifiedOWSDATE,EditorOWSUSER,Path,ParentLink,FileExtension,FileName,ServerRedirectedEmbedURL’&refiners=’EditorOWSUSER,fileextension’&refinementfilters=’and(fileExtension:or(“docx&#8221;,”pdf”,”doc”,”xls”,”xlsx”,”xlsm”,”ppt”,”pptx”,”mpp”,”csv”,”txt”) , EditorOWSUSER:or (senthamilv@outlook.com,ananana@hotmail.com))’

Peers & Manager from SharePoint profile

Please follow my prerequisite blog to add the jQuery dependency on the master page. The below jQuery code will work with jQuery dependency.

SharePoint people profile will have all the details about the peers and the manager. The below jQuery code will call the REST api to get all the peers and the manager and display in the html tag.

The below code uses the addition javascript reference /_layouts/15/sp.UserProfiles.js for the profile api

You can also download the full code from the Github


$(function () {
    GetMyTeamDetails();
});

function GetMyTeamDetails() {
    var siteUrl = _spPageContextInfo.webAbsoluteUrl + "/_api/SP.UserProfiles.PeopleManager/GetMyProperties";
    console.log(siteUrl);
    $.ajax({
        url: siteUrl,
        headers: {
            Accept: "application/json;odata=verbose"
        },
        success: function (data) {
            try {
                var peers = data.d.Peers.results;
                for (var i = 0; i < peers.length; i++) {
                    $("#peers").append(peers[i]);

                } // end of for loop

                var managers = data.d.ExtendedManagers.results;
                for (var i = 0; i < managers.length; i++) {
                    $("#manager").append(managers[i]);
                } // end of for loop
            } catch (err2) {
                alert(JSON.stringify(err2));
            }
        },
        error: function (jQxhr, errorCode, errorThrown) {
            alert(errorThrown);
        }
    });
}

Vue JS – SharePoint list operation using REST service

Please follow my prerequisite blog to add the jQuery dependency on the master page. The below jQuery code will work with jQuery dependency.

Download the files from the Github repository and make sure the Vue.js dependency is added to the Master Page. The master page sample uploaded don’t have the Vue.js reference so please add it to the master page.

Step 1:

Upload the VueSample.js and VueFile.htm to the siteassets/scripts folder.

Step 2:

Using the SliderList.stp create the List in the SharePoint site. In my case I created the List with the name BootstrapSlider.

Step 3:

Create the Page called VueJS Sample.aspx in the site. I create under the site ms so the URL will be https:///ms/SitePages/VueJs%20Sample.aspx

In the page add the content editor webpart and add the link to the /siteassets/scripts/vuefile.htm. The htm file have the necessary html content to load the data, vueSample.js file have the java script code to call the REST api from List.

Click on the Get Items to load the date from the List. The Get Items code call the REST api from the List and load the data in the bootstrap table format.

$(document).ready(function () {

  var app = new Vue({
    el: '#appvue2',
    data: {
      message: 'Click the button to see feedbacks',
      feedbackList: [],
      sliderContents: []
    },
    methods: {
      getSliders: function () {
        this.message = "Calling the slider function...";
        var endPointUrl = _spPageContextInfo.webAbsoluteUrl + "/_api/web/lists/getbyTitle('BootstrapSlider')/items";
        var headers = {
          "accept": "application/json;odata=verbose"
        };
        $.ajax({
          url: endPointUrl,
          type: "GET",
          headers: headers,
          success: data => this.sliderContents = data.d.results
        }); // jquery ajax
        this.message = "Success";
        console.log(this.sliderContents);
      } // getSliders end
    } // methods end
  }); // vue end
}); // doc ready end